
HELP
How to set up a magazine and its issues in RunMags
A print magazine is where everything you sell and plan in RunMags starts. The magazine holds its issues, sections and products. Each issue holds the dates your team works to.
When you have finished, you have the magazine, one row per issue with its publication and deadline dates, and the sections of the magazine.
Checked against the product on
Before you start
- You need access to Channels in the left-hand menu. If you cannot see it, ask your RunMags administrator.
- Have the magazine name, the issue names and the dates for each issue ready.
Steps
- In the left-hand menu, open Channels > Print.The page opens on a magazine, with its details at the top and tabs below. To open another magazine, click Search.
- To add a magazine, click New under the magazine details. Fill in Publication (the name), Abbreviation, Base height, Base width, Default # of pages, Our responsible, Brand and Type, and click Save.Skip this step if the magazine already exists.
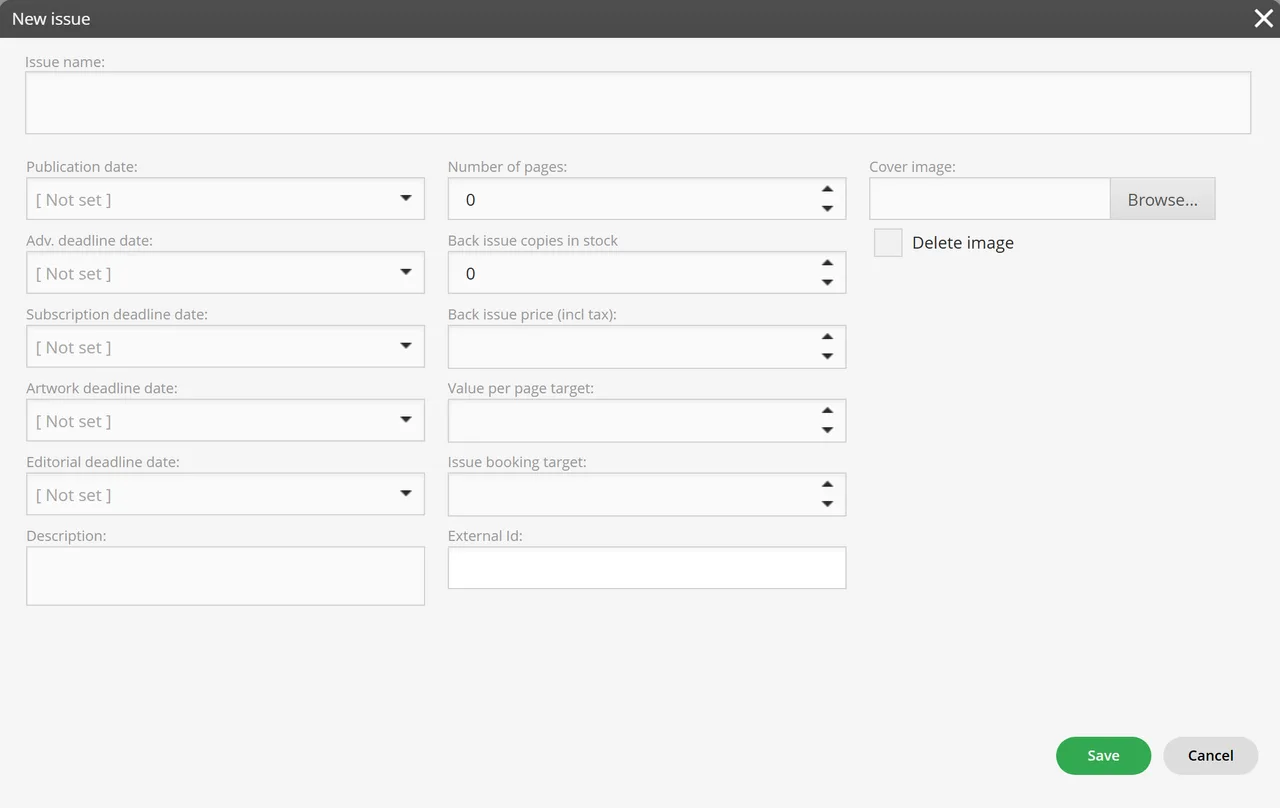
- Open the Issues tab, and click New under the list.The New issue window opens.
- Type the Issue name, for example Winter 2027.
- Set the Publication date, Adv. deadline date, Subscription deadline date, Artwork deadline date and Editorial deadline date, and click Save.Repeat for every issue you plan to sell. To change an issue later, select it and click Edit.
- Open the Sections tab and click New. Enter the Section name, a Description, a Background color and a Text color, and click Save.
What you see
- The magazine name as a heading, with its short name, base size, default number of pages, the person responsible, the brand and the type.
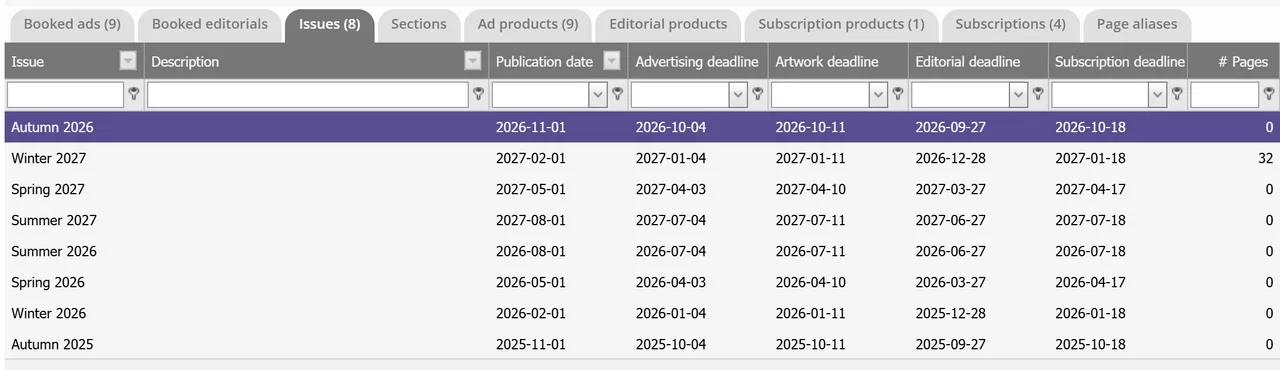
- Under it, the tabs Booked ads, Booked editorials, Issues, Sections, Ad products, Editorial products, Subscription products, Subscriptions and Page aliases. The number in brackets is how many rows a tab holds.
- On the Issues tab, one row per issue, with the dates and the number of pages.
- Under the list, the buttons Edit, New, Delete, Search and Export, and Copy issues.
Good to know
- The dates on an issue are optional. If an issue has no date of its own, RunMags works the deadline out from the publication date and the magazine’s default. A date you type on the issue always wins.
- Issue booking target and Value per page target are optional amounts for each issue.
- The choices in the magazine’s Type list are set under Admin > Product settings > Print types. Brands are set under Admin > Account > Brands.
What it does not do
- The New issue window adds one issue at a time.
- A section is a name, a description and two colours. It does not place any pages: you put pages into sections when you plan the issue.
- This page is for print magazines. Web, social media, email and events have their own entries under Channels.
If something goes wrong
- You cannot see Channels > Print in the menu. Ask your RunMags administrator for access.
- New and Edit are greyed out. Wait for the list to finish loading, then click a row.
- An issue or a magazine is missing from the list. Under the list, choose Show deleted to see whether it was deleted.
Learn more
Read the product page: Products. Or go back to all RunMags help.